• Professional, industrial-grade rat blocker
• Over 100,000 units already installed worldwide
• All parts manufactured in acid resistant 316 stainless steel
• Features dual serrated flaps
• Reversible flaps for installation from either the inlet or outfall side of the pipework
• Purpose-made, extendable handle for installation by lowering into the manhole
• Design ensures unit cannot become dislodged and lost into drainage line
• Available for pipes between DN100 & DN300
Installation Instructions
1. Remove the cover of the manhole chamber then flush a toilet to inspect the drain operation.
2. Extend the mounting pole (click to buy online) to the desired length and attach the Rat Blocker before lowering it into the manhole.
3. Once the Rat Blocker reaches the bottom, insert it into the desired position by pushing it forward until the stopper is touching the side of the chamber.
4. Turn the mounting pole clockwise until the desired tightness has been reached.
5. Remove the mounting pole and test the installation by flushing the toilet 3 times with 6-7 pieces of toilet paper and visually check that the paper and water passes the Rat Blocker.
Orientation of Flaps
All models of the Nordisk TX11 Rat Blocker are supplied with reversible flaps so that the same unit can be used in either inlet or outlet pipes.
Check that the flaps are in the correct orientation before installing the unit. If the flaps are installed in the incorrect orientation this will result in blockage of the drain as the flaps will be prevented from opening. The following images show the correct orientation of the flaps for installation in inlets or outlets (flow direction is indicated by the smaller arrows).
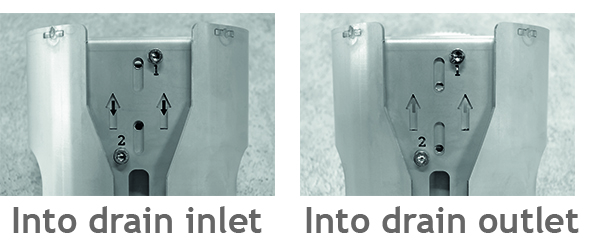
Installation into Drain Inlet
The arrow on the housing of the Rat Blocker and the smaller arrow on the flaps are facing in the opposite direction.
Installation into Drain Outlet
The arrow on the housing of the Rat Blocker and the smaller arrow on the flaps are facing in the same direction.
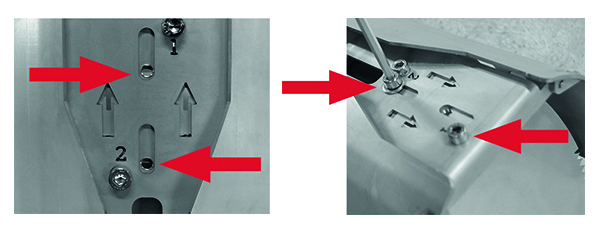
Adjusting the gap between the flaps and the bottom of the pipe
Before installing the Rat Blocker it is possible to alter the angle of the flap for a better fit into the pipe (if required), this raises the flap by 5mm from the base of the pipe. To do this, install and firmly tighten the two optional hex head (Allen key) screws with retaining washers (supplied). These can be installed on top of the Rat Blocker as shown.
IMPORTANT NOTE: The Rat Blocker can be easily removed and re-installed for drain cleaning and maintenance purposes. Ensure the installation instructions are followed carefully when re-installing the unit.
The installer’s name and telephone number should be recorded on the installation plate which should be mounted visibly within the inspection chamber. The installer should be contacted to service the unit.
During the first three months it is important to check that the Rat Blocker is operating correctly. The Rat Blocker must be inspected and cleaned at least once a year.
It is recommended that a service agreement is put in place for the inspection and maintenance of the installed Rat Blocker.
